So your brand new Photologo has been delivered to your email box and you can’t wait to start signing your precious photographs, but you’re not sure where to begin?
If you are used to editing your images in Lightroom, but watermarking is not your forte, I put together an easy tutorial where you will learn the easiest way to apply your Photologo into your digital creations using its Watermark tool.
In a few quick steps, I will show you how to protect your photographs against unauthorized use and start building your personal brand.
Getting Your Signature Logo:
Hiring a calligrapher: once a pricey option (think $500+), can now be yours for just $39! Get yours crafted by a pro calligrapher in 2-3 days. Below are some examples from our studio. Click here to get your unique Signature Logo.


Step by Step
1. First of all, install and launch Lightroom: For this tutorial, I’m using Lightroom Classic CC. Next, click on the Import button which is placed in the bottom left corner. Lightroom supports JPEG, PNG and also RAW files.
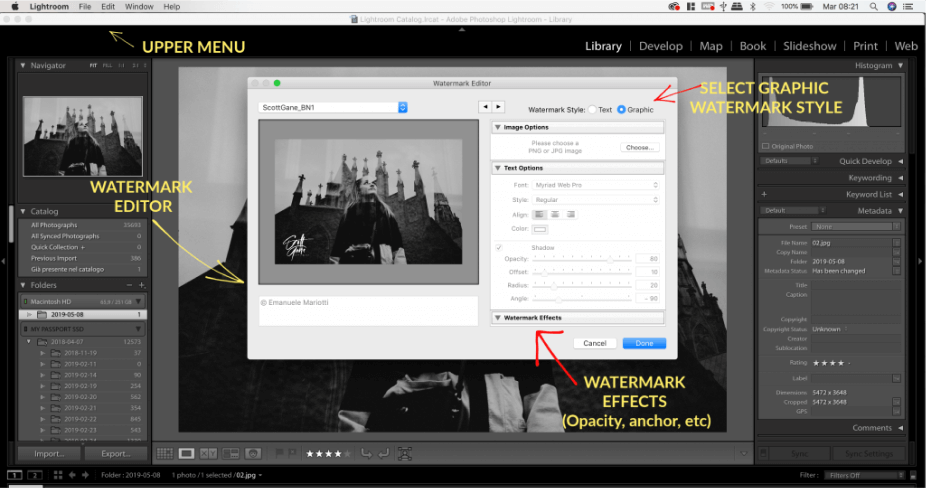
Here’s a quick guide of the tools you’ll need:
2. Now it’s time to open the Watermark Editor: Go on the top left corner in the main menu: Lightroom menu > Edit Watermarks (Mac) or Edit menu > Edit Watermarks (Windows). The Watermark Editor window is pretty small by default. My suggestion is to click and drag the top right corner of the window to enlarge it. This will make applying and editing your Photologo much quicker and easier.
3. In the Watermark Editor: Select Graphic as the watermark mark. A message should pop up prompting you to choose the file you need to sign your photographs. Go to the folder where you have your Photologo files stored and choose the one that fits best. Your custom Photologo is made to fit a wide variety of cases, so the file you received from our studio contains multiple different versions to choose from.
To be more specific, every Photologo is delivered in the following formats and types:
– Black and White versions
– High and Low resolution (of both colors)
– In PNG file format
– With a transparent background, ready to be applied
For darker or color-saturated images, we suggest using a white Photologo. For images with light tones or bright background, choose the black version of your logo.
4. Expand the Watermark Effect drop-down menu: You can now use the panel that you see to Resize your signature Photologo and to choose an Anchor Point to place it on your photo. Then, if you want to keep your logo more subtle, simply adjust the Opacity level on the same menu.
Once you have adjusted your watermark settings according to your preferences, click up to the drop-down menu in the upper left of the window where it says Custom, and select Save Current Settings as a New Preset. Enter a preset name for the current settings (I chose My-name_WhitePhotologo) and tap save.
The good news is that you can save several watermark presets using, for example, both the white and black versions with different anchor points. Just repeat the steps above selecting a different Photologo and choosing a different placement.
IMPORTANT: You will not see your Photologo on your photos while in Lightroom. The watermarking feature is only applied upon exporting. To do that, go to File>Export and open the Export dialog box, scroll down to the Watermarking section and select the watermark preset you previously saved from the drop-down menu, then tap the Export button in the bottom right of the window.
Your photographs are now signed and ready to go!
Getting Your Signature Logo:
Hiring a calligrapher: once a pricey option (think $500+), can now be yours for just $39! Get yours crafted by a pro calligrapher in 2-3 days. Below are some examples from our studio. Click here to get your unique Signature Logo.


